
-
- iTransfer Platinum Mac

- iPhone Transfer Platinum Mac
- iPad Mate Platinum Mac

- PodWorks Platinum Mac
- iPhone Ringtone Maker Mac
- iPhone Transfer Plus Mac
- iPad Mate for Mac
- PodWorks for Mac
- iPhone Contacts Transfer Mac
- DVD to Video for Mac
- DVD to MP4 Converter for Mac
- DVD to iPhone Converter for Mac
- Blu-ray to Video Converter for Mac
- DVD to iPad Converter for Mac
- DVD to Audio Converter for Mac
- DVD Creator for Mac
- Video Converter for Mac
- MP4 Converter for Mac
- 3D Movie Converter Mac
- Video Editor 2 for Mac
- Audio Converter Pro Mac
- YouTube Video Converter for Mac
- Download YouTube Video for Mac
- YouTube HD Video Downloader Mac
- YouTube to iTunes Converter Mac

- YouTube to iPhone Converter Mac
- HEVC/H.265 Converter for Mac
- iTransfer Platinum Mac
- More
The Best Way to Convert DVD to iPod
Page 2 Of 3
- It will take half of the duration time to convert whole DVD. After the converting process is done, please run iPod Video Converter and load the output AVI file into the program. Highlight your file in the program, and select “Profile” and “Destination” for it. The output file will be found in the “Destination” folder you set. And “C:Temp” will be the default one.
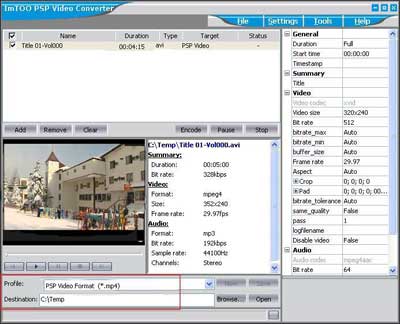
- There are four options in the “Profile” box; one is for iPod audio format (MP3); the other three options are for video outputs in different quality.

You will get a first-class output file if you select “Excellent Quality”, but the size of the file would be quite large in this way. According to our test, in excellent quality conversion, if your original video file is in 2 hours duration, the output file will be larger than 500 MB, which means it is beyond the capability of 512 MB memory stick. But with “Minimal Size” output, the output file will be about 220 MB, which means it is possible that you store two DVD movies on your 512 MB memory disk. Generally speaking, we recommend the default setting, “iPod Video Format”, which will produce medium quality in proper size.
Actually, while you select different output option, the settings will be modified automatically. For example, if you select “Minimal Size”, “Video Size” will show 160X112 and “Bit Rate” will show 216 for it automatically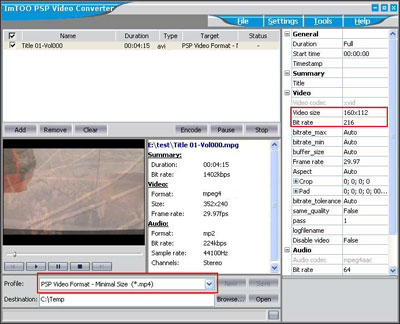
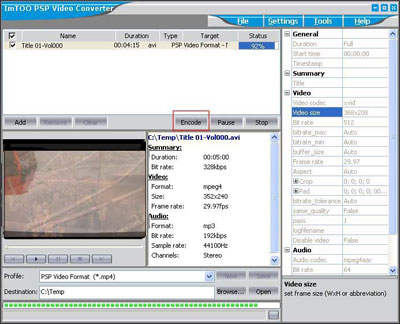
- After you decide everything, please just click “Encode” to start the conversion to iPod format. And after the conversion is done, you will get MP4 file in the output folder. You can click “Open” to reach the folder directly.
What to do next? Enjoy your DVD on the iPod.
| <- Pervious Page | Next Page-> |