
-
- iTransfer Platinum Mac

- iPhone Transfer Platinum Mac
- iPad Mate Platinum Mac

- PodWorks Platinum Mac
- iPhone Ringtone Maker Mac
- iPhone Transfer Plus Mac
- iPad Mate for Mac
- PodWorks for Mac
- iPhone Contacts Transfer Mac
- DVD to Video for Mac
- DVD to MP4 Converter for Mac
- DVD to iPhone Converter for Mac
- Blu-ray to Video Converter for Mac
- DVD to iPad Converter for Mac
- DVD to Audio Converter for Mac
- DVD Creator for Mac
- Video Converter for Mac
- MP4 Converter for Mac
- 3D Movie Converter Mac
- Video Editor 2 for Mac
- Audio Converter Pro Mac
- YouTube Video Converter for Mac
- Download YouTube Video for Mac
- YouTube HD Video Downloader Mac
- YouTube to iTunes Converter Mac

- YouTube to iPhone Converter Mac
- HEVC/H.265 Converter for Mac
- iTransfer Platinum Mac
- More
ImTOO iPad Mate for Mac Guide

ImTOO iPad Mate for Mac provides the perfect solution to convert CDs/DVDs/videos/audios/photos to iPad supported files, transfer multimedia files between iPad, Mac and iTunes and manage iPad files as iTunes does.
The following article will tell you how to use this iPad transfer/converter/manager handily.
For your convenience, the guide includes 6 parts:
Part 1: Transfer video/audio files and photos from Mac to iPad
Part 2: Copy iPad music/movies/photos to Mac
Part 3: Transfer iPad contents to iTunes
Part 4: Convert and transfer CD/DVD to iPad/iTunes
Part 5: Convert and transfer incompatible video/audio files to iPad/iTunes
Part 6: More Applied functions
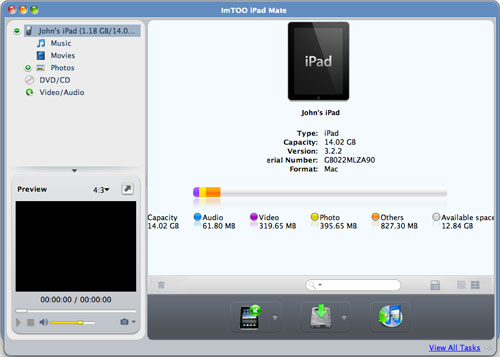
Firstly, download ImTOO iPad Mate for Mac and then install and run it. Connect your iPad to Mac, this application can recognize the device automatically and show its information on the main interface including name, type, capacity, version, serial number and format.
Part 1: Transfer video/audio files and photos from Mac to iPad
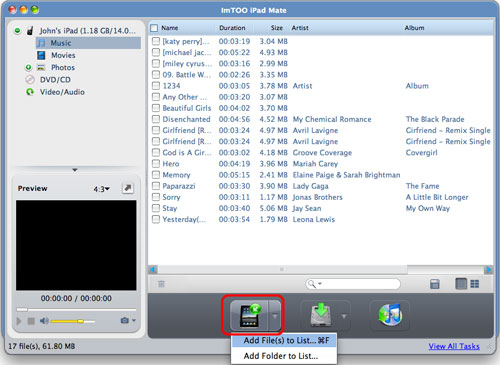
At first, Open the library or playlist you want to import files to. Then click "Add File(s) to Device" drop-down button at the bottom and choose "Add File(s) to List" or "Add Folder to List" option to import the desired files to iPad.
Or you can right-click the library or playlist and choose "Add File(s) to List" or "Add Folder to List" option to import files you want to load.
Part 2: Copy iPad music/movies/photos to Mac
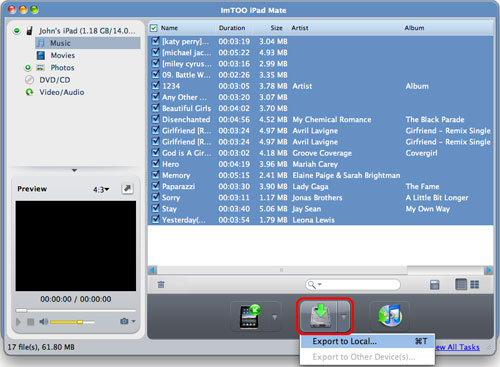
Open a library/playlist/photo album and check the needed files in the right list. Then click "Export Checked Files to Local Folder" drop-down button and choose "Export to Local" option to export selected files to Mac. Or right-click the checked files and choose "Export to Local" option to copy iPad files to the target folder.
Part 3: Transfer iPad contents to iTunes
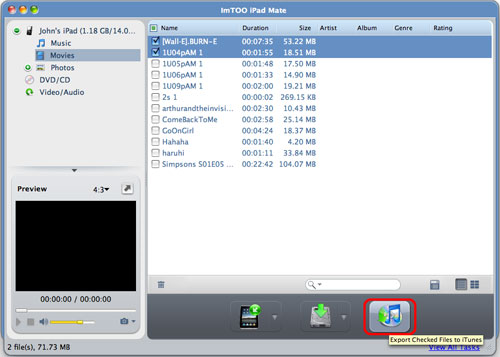
Open a library/playlist and check files you want to transfer to iTunes. Then click "Export Checked Files to iTunes" button to start transferring files to iTunes. And iTunes opens at the same time.
You can also complete transferring by right-click menu.
Part 4: Convert and transfer CD/DVD to iPad/iTunes
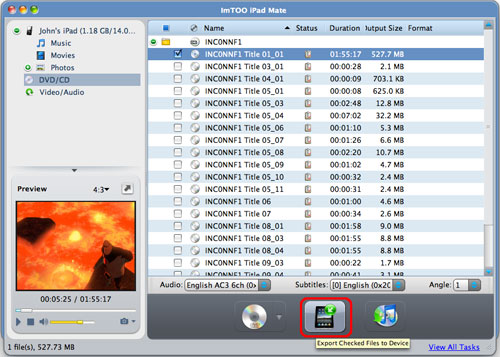
Insert a CD/DVD disc to your Mac and select CD/DVD node in the left tree. Then click "Open DVD" button to load the inserted CD/DVD or local DVD folder/ISO file/IFO file into the list. Check the desired files in the list and click "Export Checked Files to Device" or "Export Checked Files to iTunes" button to transfer them to your iPad or iTunes library.
Tip: If you didn't connect any device, the application will prompt you with a dialog to indicate that no device is connected after you click "Export Checked Files to Device" button. Click "Yes" to continue converting DVD movie and saving it into CD/DVD node for later usage or click "No" to cancel the operation.
Part 5: Convert incompatible video/audio files and transfer them to iPad/iTunes
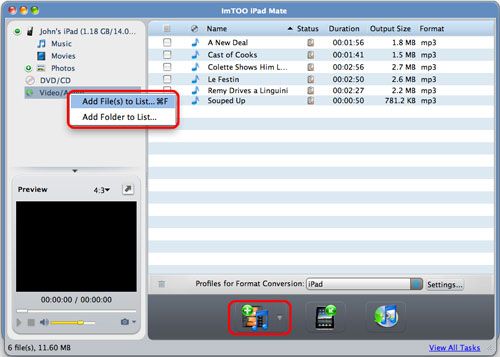
Select Video/Audio node in the left tree at first, click "Add File(s) to Device" drop-down button and choose "Add File(s) to List..." or "Add Folder to List..." option to load files from local disk into the list. Then check files in the list and click "Export Checked Files to Device" or "Export Checked Files to iTunes" button to copy them to your iPad or iTunes library.
Tip: If you didn't connect any device, you can also convert the loaded video/audio files to iPad supported formats and save them into the video/audio node for later operation.
Part 6: More Applied functions
*Transfer files between multiple devices
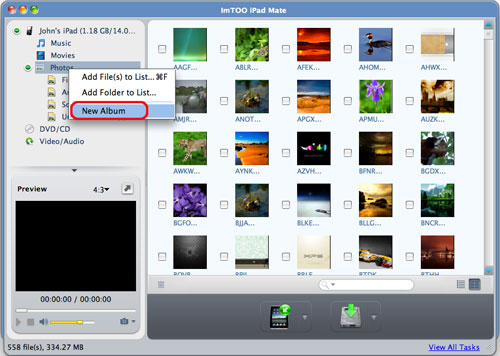
In the left tree, select a device, right click Photos node and choose "New Album" option to create a photo album. Then right click the new photo album node to rename/delete it, create a new one or import photos from local disk to it.
In photo list, you can copy or move photos between different albums by drag-and-drop or from right click menu.
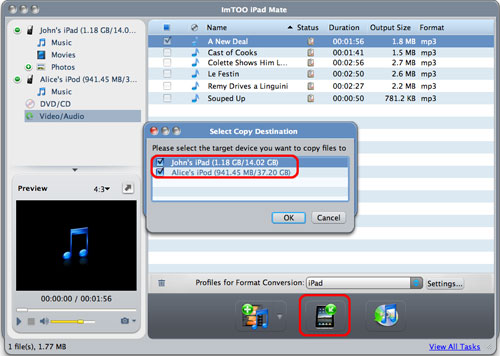
When you connect several devices, you can do the following:
Under device node, right click the checked files in the list and choose "Export to Other Device(s)" option to transfer them to other devices.
Under CD/DVD or Video/Audio node, after you click "Export Checked Files to Device" button "Select Copy Destination" dialog will pop up to ask you to choose the target devices. Check the needed devices and click "OK" to start transferring selected files to different devices simultaneously.
*Create/edit/delete photo albums
Tips:
1. You can also create a playlist by clicking "File -> Playlist" option and choosing "New Playlist" option from the submenu or right clicking any library and choosing "New Playlist" option from the right-click menu.
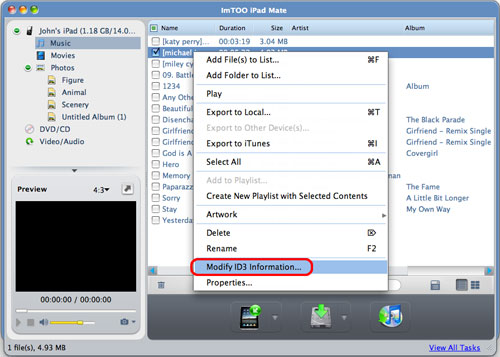
*Edit ID3 tag info
Firstly, select device's library or a playlist in the left tree. Then right click the needed file in the list and choose "Modify ID3 Information…" option and edit the ID3 information of them, including Name, Artist, Album Artist, Year, Album, Grouping, Artwork and etc. And you can also add rate and comment to the file in opened "ID3 Information" window.